|
|
|
|
|
|
|
|
|
|
|
|
|
|
|
|
|
|
|
|
|
|
|
|
|
|
|
|
|
|
|
|
|
|
|
|
|
|
|
|
|


 |
 |
 |
 |
|
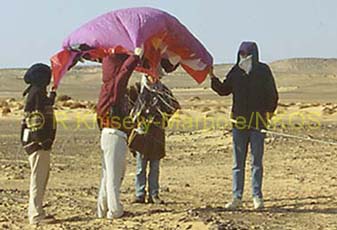
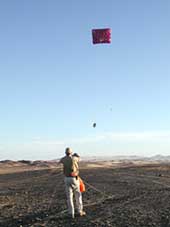
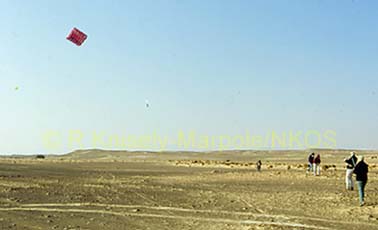
This was originally written in 2005!! When I set up the new digital kap system in 1999, I chose an Olympus C3030Z camera because it was very flexible, allowing controls to be set manually or automatically, giving the best parameters for KAP. It is also VERY strong - surviving several horrendous crashes. The quality of the image is second to none, allowing me to easily obtain A4 prints and even A3 with some help from Photoshop. The kite is a sparless aerofoil from Greens Kites of Burnley, UK. They sell a kap kit complete with a very basic cradle to hold the camera. I built an alloy cradle to house the camera and give it some protection. As with most of the compact digital cameras on the market, the C3030 doesn't have any form of electronic remote release, this means that it was necessary to build into the cradle a mechanical device triggered by radio control to press the shutter button. This can be seen clearly in the photograph, as can the battery box for the 4 rechargeable batteries which power the unit. There is no way of controlling the direction of the camera once in the air, so I had to judge wind direction and fly from a point where the wind should take the camera over the required area, some moving about was necessary, as the wind at height was often different to that at ground level. It was possible to bring the kite down by running a karabiner along the line (Angela became very adept at this) and remove or adjust the camera without the kite actually coming to rest, very useful when I needed to adjust the angle of the camera. On my first trip, I used an 'H' frame to hold and control the kite line, but this proved useless, being ripped out of my hands in a sudden strong gust of wind, so I obtained a chair leg and wrapped the line round this several times to obtain enough friction to control the line, the 'H' frame being used purely to hold the line and was allowed to simply bounce around on the ground. The chair leg worked well, but generated a good deal of friction. During that first season, we had some very strong winds, nearly lifting me off the ground and on one occasion the line broke where it had been weakened by the heat of the friction! So it was back to the drawing board for the second season. This time, I used an alloy bicycle wheel hub with handles on each side as a friction device. Six or seven turns round it was enough to allow me to control the run of the line with just my thumb. The line was stored and released from a bag attached to a belt round my waist, which works fine but takes some time to reload all the line (200 metres) at the end of the flight. Keeping it simple is the name of the game, with as few mechanical parts as possible, and those that there are can be easily repaired should it be necessary. I carry a kit of spare parts and the whole thing packs into a small rucksack, making it very portable. Thanks to Drs Rossi & Ikram for the pics of the kite in use. |
 |
 |
|
 |
|
 |
|
| See our kap featured on National Geographic |